

Tiling a bathroom floor represents a formidable home improvement project, providing multiple benefits that homeowners will find advantageous. First and foremost, the durability of tiles makes them an exceptional material choice for this frequently used space. Unlike other flooring options, tiles can withstand the wear and tear associated with daily activities, ensuring that your bathroom can endure high foot traffic without compromising its appearance. This longevity can be particularly important in maintaining the aesthetic appeal of one’s home over the years.
Moreover, tiles are inherently water-resistant, making them ideal for humid environments such as bathrooms. This characteristic helps prevent issues such as mold and mildew development, which are common in areas exposed to excessive moisture. By choosing the right tiles, homeowners can create a safe and sanitary environment while reducing the risk of damage caused by water infiltration. The water-resistant properties of tiles also allow for easier cleaning and maintenance, further enhancing their practicality.
In terms of aesthetic value, tiles are available in a wide variety of colors, patterns, and finishes, offering considerable versatility to suit different design preferences and themes. Whether a homeowner seeks a modern, minimalist look or a more traditional, ornate appearance, bathroom tiles can be tailored to match these visions. Such customization not only contributes to the visual appeal of the space but can also elevate the overall value of the home, as well designed bathrooms are often a significant factor for potential buyers.
In summary, tiling a bathroom floor not only enhances its functionality through durability and water resistance but also adds significant aesthetic and financial value to a property. The following sections will detail the steps involved in successfully tiling a bathroom floor, guiding you through this rewarding home improvement project.
Tools and Materials Needed
When embarking on the project of tiling a bathroom floor, having the right tools and materials is crucial for achieving a professional-looking finish. The first essential item you will need is the tiles themselves. For bathrooms, it is advisable to choose moisture-resistant tiles that are easy to clean. Ceramic or porcelain tiles are excellent choices due to their durability and aesthetic appeal. When selecting tiles, consider the size and color, ensuring they complement the overall design of the bathroom.
Next, you will require adhesive to secure the tiles to the floor. It is vital to select a high-quality tile adhesive suitable for wet areas. Additionally, grout will be needed to fill the gaps between tiles. There are different types of grout available, such as sanded and unsanded; sanded grout is generally recommended for wider joints, while unsanded is suitable for narrower joints.
A tile cutter is another critical tool, enabling you to make precise cuts to fit tiles around corners and obstructions. Depending on your comfort level, you can choose manual or electric tile cutters. You will also need a trowel for spreading adhesive, which should have the appropriate notch size compatible with the tiles you are using.
To ensure that your tiles are laid evenly, a level is indispensable. Checking that each tile is installed correctly will prevent issues with lippage in the future. Lastly, do not overlook safety gear, including gloves, goggles, and knee pads, to protect yourself during the tiling process. Adequate preparation by gathering these tools and materials can significantly impact the project’s success and safety, promoting a smooth tiling experience.
Preparing the Floor
Preparing the bathroom floor is a critical first step in the tiling process. The longevity and appearance of the tiles depend significantly on the condition of the floor beneath them. To begin, the existing surface must be thoroughly cleaned to remove dirt, dust, or debris that could impede the adhesion of the tiles. A simple sweep and mop may suffice, but for more persistent stains or residues, a dedicated floor cleaner might be necessary.
It is equally important to check for any damage on the current floor. Cracks, holes, or soft spots can compromise the stability of the tiles. Noting these issues allows for timely repairs, which may include filling cracks with appropriate filler or replacing damaged sections entirely. After addressing these concerns, the surface must be evaluated for its levelness; uneven surfaces can lead to tiles cracking or shifting over time.
To ensure the floor is appropriately leveled, a level can be used to check various sections of the surface. If any discrepancies are found, a self-leveling compound can be applied to create a smooth and even base. Additionally, it is essential to remove any old flooring, such as vinyl or carpeting, which can interfere with the installation of new tiles. This removal process should be conducted carefully to avoid damaging the subfloor, enabling optimal tile placement.
In conclusion, a clean, level, and damage-free floor significantly enhances the likelihood of a successful tiling job. Investing time and effort into these preparatory steps cannot be overstated; they set the foundation for ensuring your bathroom tiles adhere properly and maintain their integrity over time.
Planning the Tile Layout
Before embarking on the task of tiling a bathroom floor, careful planning of the tile layout is essential. This preparatory stage can significantly influence the final appearance and functionality of your tiled surface. Accurate measuring of the area is the first step. To do this, use a tape measure to determine the width and length of the bathroom floor. Multiply these two dimensions to calculate the total square footage, which will help in estimating the number of tiles required and minimizing waste.
Choosing the best starting point for the tile installation is crucial for achieving a visually appealing outcome. Ideally, the center of the room should serve as the starting point, especially in areas where symmetry is key to the design. This center point can be identified by measuring the length and width of the room and marking the intersections on the floor. Laying a few rows of tiles without adhesive can help visualize how the final layout will look and can reveal any adjustments needed to enhance symmetry.
Using spacers while visualizing the tile arrangement is another helpful tip. These spacers provide a uniform grout line between the tiles, ensuring a professional finish. Place spacers at the corners of the tiles as you lay them out, which allows you to assess the overall flow and alignment. If you notice any inconsistencies or awkward gaps, adjust the layout before committing to the adhesive. This approach is instrumental in maintaining an aesthetically pleasing design throughout the floor.
In summary, meticulous planning of the tile layout contributes significantly to the success of the tiling project. By accurately measuring the area, selecting a suitable starting point, and employing spacers effectively, one can achieve an attractive and functional bathroom floor.
Mixing Tile Adhesive
Mixing tile adhesive correctly is crucial for ensuring a solid bond between the tiles and the floor, particularly in a moisture-prone environment such as a bathroom. To begin, it’s essential to select an appropriate adhesive suitable for bathroom conditions, typically a premixed thin-set mortar or a powdered adhesive that can resist mold and moisture. When choosing the adhesive, ensure it is rated for wet areas, particularly for floors, as this will enhance durability and performance.
To mix your tile adhesive effectively, first, read the manufacturer’s instructions concerning the required ratios of adhesive powder to water. Commonly, the ratio is approximately 2 parts adhesive to 1 part water; however, this can vary by product. Begin by adding water to a clean mixing bucket, followed by gradually adding the adhesive powder while stirring continuously. This ensures that the adhesive mixes uniformly without clumps. A mixing paddle attached to a drill can significantly expedite this process, ensuring a consistent mix.
As you mix, aim for a creamy, lump-free consistency that can hold a notch when applied. Typically, the ideal blend should adhere to the spatula and be workable without being overly runny. It’s also critical to mix only the amount that can be used within the specified working time, usually 30 minutes, to prevent wastage and to maintain optimal adhesive quality.
Always prioritize safety by wearing appropriate protective equipment such as gloves and a mask, as fine dust can be inhaled or irritate the skin. Once your adhesive is well-mixed and reaches the desired consistency, you can proceed to apply it to the bathroom floor using a trowel, ensuring even coverage for effective tile placement.
Laying the Tiles
Laying tiles on a bathroom tiling floor requires precision and care to achieve a professional finish. The process begins after ensuring that the subfloor is clean, dry, and level. Begin by selecting an appropriate tile adhesive that matches the type of tiles being used. The adhesive should be mixed as per the manufacturer’s instructions to ensure optimal bonding. Utilizing a notched trowel, spread the adhesive onto a section of the floor, starting in the corner farthest from the entrance. This method allows for consistent coverage while minimizing the risk of stepping on wet adhesive.
Once the adhesive is applied, it is essential to place the tiles systematically. Start by laying the first tile in the corner and pressing it firmly into the adhesive. To maintain even spacing between the tiles, use tile spacers at each corner of the tile. It is recommended to check for levelness after placing each tile; this ensures that the surface remains even and does not lead to future complications.
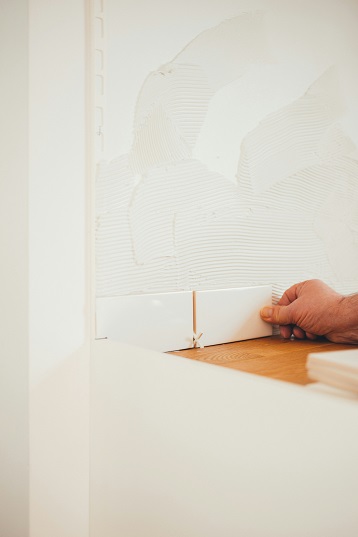
As you move along the layout, you may encounter the need to cut tiles to fit around corners or edges. This can be accomplished with a tile cutter or wet saw, depending on the type of tiles you are using. Be sure to measure carefully before making cuts to avoid any errors. If adjustments are necessary during the laying process, such as re-positioning a tile that is misaligned, do so while the adhesive is still wet. This will allow for a seamless final appearance.
After laying down all tiles, allow the adhesive to cure according to the manufacturer’s guidelines before proceeding to grouting. Following these steps will ensure that the tiling process is efficient and leads to a beautiful, long-lasting bathroom floor.
Cutting and Fitting Tiles
When undertaking the task of tiling a Bathroom Tiling floor, especially around various fixtures such as toilets and sinks, it is crucial to accurately cut and fit the tiles for a professional finish. One of the first steps is to assess the layout, ensuring that the tiles are placed in a manner that minimizes the need for extensive cuts. This often involves starting from the center of the room and working outward.
Various tile cutting techniques exist to help achieve precision when cutting tiles to fit around obstacles. A manual tile cutter is one of the most common tools used, as it allows for straight cuts with minimal effort. For complex cuts, such as those needed around a toilet or sink, a wet saw is often recommended. This tool uses a diamond blade and water to minimize dust and achieve a smoother cut.
In addition to these tools, tile nippers can come in handy for small adjustments and to tackle intricate edges where precision is key. When fitting tiles, it is advisable to make a template using cardboard to trace the shape of the obstacle accurately. This method helps ensure the tiles fit snugly without gaps and maintains a clean appearance.
Common challenges during this phase include breaking tiles incorrectly and making uneven cuts. To counteract these issues, always measure twice before cutting and proceed slowly. Start with a test cut on a spare tile to practice and refine your technique. Additionally, wearing safety gear, such as goggles and gloves, will protect you from potential injuries during the cutting process.
In summary, taking the time to understand the tools and techniques for cutting and fitting tiles around obstacles is essential. With the right preparation and careful execution, it is possible to achieve a polished look for your bathroom floor, enhancing its overall aesthetic and functionality.
Grouting the Joints
After successfully laying the tiles, the next critical step is grouting the joints. Grout serves not only to enhance the aesthetic appeal of your tiled surface but also to provide structural support when cementing the tiles together. To begin, it is essential to select the appropriate grout for your bathroom. In most cases, unsanded grout is ideal for spaces smaller than 1/8 inch, while sanded grout is recommended for wider seams as it prevents cracking.
Once you have chosen your grout, the application process can commence. Start by mixing the grout according to the manufacturer’s instructions, ensuring that it achieves a smooth and consistent texture. Using a rubber float, spread the grout diagonally across the tiles, applying firm pressure to push the mixture into the joints completely. Be cautious to avoid trapping air pockets, which can lead to weak spots or defects in the grout line.
After filling the gaps, it is essential to clean off any excess grout from the surface of the tiles. This can be efficiently done with a damp sponge, but be sure to wring out any excess water to prevent slumping into the grout lines. Gently wipe diagonally across the tile, as this method helps to minimize the removal of grout from the joints. After a few minutes, the grout will start setting, so it’s important to work quickly to achieve a clean appearance.
To achieve a neat finish, consider using a grout sealer after the grout has cured fully. This prevents moisture penetration and stains while extending the life of the grout, ensuring a durable and visually appealing bathroom floor.
Finishing Touches and Maintenance Tips
Once the tiles are laid and the adhesive has cured, the next crucial step is to attend to the finishing touches that will enhance both the functionality and appearance of your new bathroom floor. One of the primary tasks is to seal the grout lines. Grout sealing is essential as it helps to prevent moisture penetration, thereby minimizing the risk of mold and mildew development. Using a high-quality grout sealer, apply it to the grout lines according to the manufacturer’s instructions. This not only protects the grout but also helps to maintain its color and integrity over time.
Adding trim or baseboards around the edges of the tiled floor can provide a polished look to the overall installation. Choose a trim that complements the tile in both style and color. Ensure that the trim is properly installed to cover the edges of the tiles neatly. Furthermore, caulking the junctions between the tiled floor and surrounding structures can improve the waterproofing of this area, reducing the chances of water damage.
Once your tiling project is complete, it is vital to implement a maintenance routine to ensure the floor’s longevity. Regular cleaning should be performed to remove dirt and debris that can accumulate over time. Use a pH-neutral cleaner specifically designed for tiled floors. Avoid harsh chemicals, as they can damage the tile’s surface and compromise the grout. It’s also a good idea to periodically inspect the grout for cracks or damage; repairing grout lines promptly can prevent larger issues in the future.
By following these finishing touches and maintenance tips, your new bathroom floor will not only look good but also stand the test of time, maintaining both aesthetic appeal and functionality for many years to come.