


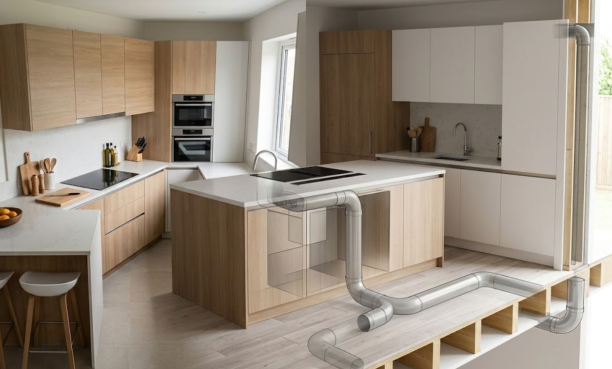
Installing a range hood often looks like a straightforward kitchen upgrade: choose a position, mark the holes, secure the mounting hardware, and connect the ventilation. However, the visible wall only tells part of the story. Electrical cables, plumbing, gas lines, wall studs, insulation, and other components may be hidden behind the surface. Drilling without considering them can turn a simple installation into a costly repair.
Before deciding exactly where the hood will go, it is worth inspecting the wall and planning the surrounding space. The wall construction, mounting support, electrical requirements, duct route, and required clearance all influence whether a particular position is suitable. Taking time to check these details can improve safety, make installation easier, and reduce the chance of discovering an expensive problem after work has already begun.
Why You Should Inspect the Wall Before Drilling
The first reason to inspect the wall is safety. Kitchen walls can contain several types of concealed services, particularly around cooking areas where electrical connections, plumbing, and ventilation systems may already exist. A drill hole that seems harmless from the outside could potentially interfere with something hidden inside the wall cavity.
Structural support is another important consideration. A range hood needs a secure mounting point that can handle its weight and normal vibration during operation. The strength of the wall surface alone may not be enough, especially with drywall or other lightweight finishes. Before drilling, you should understand how the wall is constructed and where suitable support is available.
Inspection also helps with ventilation planning. A mounting position might appear ideal visually but create problems for the duct route, electrical connection, or required clearance. Checking these factors together allows you to select a position based on the complete installation rather than simply choosing the most convenient spot on the wall.
Identify What Type of Wall You Are Working With
The wall material is one of the first things to identify because different surfaces require different mounting approaches. A drywall-covered framed wall behaves differently from a solid brick or concrete wall. Tile can also change how drilling and mounting need to be approached because the finished surface may be more vulnerable to cracking or damage.
With drywall, the location and strength of the framing behind the surface are particularly important. Brick and concrete may provide substantial support, but the appropriate fasteners and drilling methods can differ significantly from those used for framed walls. A tiled backsplash can add another layer that needs to be considered before marking or drilling.
Look closely at the area where the hood will be mounted. Signs of previous renovation work, patched holes, unusual wall thickness, cracks, moisture damage, or uneven surfaces may indicate that the wall requires additional attention. Understanding the construction before choosing the mounting method can prevent avoidable problems later.
Locate Studs and Determine Where the Hood Can Be Supported
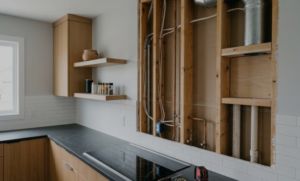
For a framed wall, locating the studs is one of the most important steps before mounting a hood. Studs provide a stronger structural connection than relying only on the wall covering. Their position should be considered alongside the mounting bracket and the manufacturer’s installation requirements.
A stud finder can help identify likely framing locations, but the result should be interpreted carefully. Wall construction, metal components, pipes, and other materials can affect detection. The goal is not simply to find something that appears to be a stud but to establish a reliable mounting position that matches the hood’s hardware.
When planning a wall mount range hood, compare the mounting template with the available support points before making holes. If the recommended mounting locations do not line up with suitable framing, do not assume that ordinary wall anchors will automatically provide enough support. Depending on the wall construction and hood design, reinforcement or another approved mounting solution may be necessary.
The mounting surface should also be reasonably stable and free from significant damage. A strong attachment begins with a sound wall, not just strong hardware.
Check for Electrical Wiring Behind the Wall
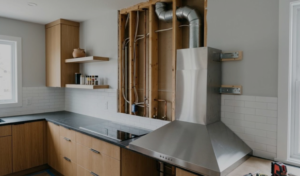
Electrical wiring deserves particular attention because it may run through areas that look completely clear from the outside. Existing outlets, switches, junction boxes, or other electrical components can provide clues about possible cable routes, but they do not reveal everything inside the wall.
Before drilling, consider how the hood will receive power. Some models are designed to plug into an appropriate outlet, while others may require a dedicated or hardwired electrical connection according to the manufacturer’s specifications and local requirements. The planned mounting location should work with that electrical arrangement rather than forcing an improvised solution.
It is also important not to treat a stud finder or similar tool as proof that a location is free from electrical wiring. Detection tools have limitations, and concealed services may not always be identified accurately. If you are uncertain about electrical wiring or need to modify a circuit, stop and consult a qualified electrician rather than taking unnecessary risks.
Check for Plumbing, Gas Lines, and Other Hidden Utilities
Electrical wiring is not the only hidden service that can create problems. Kitchen walls may also contain water pipes, drain lines, gas piping, HVAC components, or other building systems. Their presence can depend on the home’s layout and previous renovation work, so assumptions based only on the visible wall are unreliable.
Pay particular attention if the opposite side of the wall contains a bathroom, utility area, sink, appliance connection, or mechanical equipment. These features can provide useful clues about what may be routed through the wall cavity. Previous remodeling can also mean that the current layout is not exactly what the original construction plans would suggest.
If you discover a pipe, gas line, or another obstruction where you intended to drill, don’t simply move the hole a few inches and continue. The obstruction may extend along the wall or indicate a larger utility route. Gas-related work should be handled by an appropriately qualified professional, and uncertain utility locations should be resolved before drilling.
Plan the Duct Route Before You Commit to the Mounting Position
A hood’s position should work with its ventilation route, not just with the available wall space. If the model is designed for ducted ventilation, determine where the duct will travel before finalizing the mounting location. The shortest or most convenient route is not always possible once framing, ceilings, cabinets, and exterior walls are taken into account.
Consider whether the duct will travel horizontally through an exterior wall or vertically toward the roof or another approved termination point. The required duct diameter should match the manufacturer’s specifications, while unnecessary bends and restrictions should be avoided where possible.
The outside termination point also matters. A duct needs a suitable path to discharge air rather than ending in an unsuitable enclosed space. Before drilling a large opening for ventilation, make sure the proposed route is practical and does not conflict with structural components or other building services.
This is an important distinction: a location can be physically suitable for mounting a hood but unsuitable for effective ventilation. Planning both elements together produces a more reliable installation.
Inspect the Wall Surface and Mounting Area
Once the wall structure and hidden utilities have been considered, inspect the surface itself. Look for cracks, loose plaster, damaged drywall, moisture stains, deteriorated sections, uneven areas, or old holes from previous fixtures. These problems can affect how accurately the mounting hardware sits against the wall.
Tile requires additional care because drilling can damage the finished surface if handled incorrectly. If the hood will be installed above an existing backsplash, consider both the condition of the tile and what lies beneath it. A visually attractive surface does not necessarily mean the underlying wall is suitable for mounting.
Old mounting holes can also be useful clues. They may indicate where a previous hood, cabinet, or appliance was installed, but they should not automatically be reused. The previous installation may have used a different mounting system or may have left behind weakened material.
A clean, stable mounting area makes it easier to position the hood accurately and reduce movement or vibration after installation.
Confirm Clearance and Nearby Appliance Placement
Before finalizing the height and position, check the required clearance between the hood and the cooking surface. The correct distance can vary depending on the hood design, cooking appliance, manufacturer instructions, and applicable requirements. The manufacturer’s specifications should take priority over assumptions based on how another kitchen is arranged.
Also look beyond the hood itself. Cabinets, shelves, windows, doors, ceilings, and nearby appliances can influence how comfortably the hood fits into the space. A position that works on paper may become inconvenient if a cabinet door cannot open fully or another appliance interferes with access.
Consider nearby cooking appliances as part of the overall layout. For example, if the kitchen includes a Ciarra Nosh Oven, its placement, ventilation needs, electrical requirements, and access should be considered alongside the hood rather than treated as completely separate planning decisions.
The objective is to maintain adequate clearance while preserving practical workspace and access to the surrounding appliances. Checking these relationships before drilling can prevent a visually awkward or difficult-to-use installation.
What to Do If You Find an Obstruction Behind the Wall
Finding an obstruction does not necessarily mean the installation is impossible, but it does mean the original plan should be reconsidered. The appropriate response depends on what the obstruction is and how it relates to the building structure and the hood’s installation requirements.
For example, an inconvenient stud may require a different mounting arrangement or suitable reinforcement. Electrical wiring may require the mounting position to be reconsidered, while plumbing or gas lines may make a particular drilling location unsuitable altogether. A duct obstruction could require a different ventilation route.
The important point is to avoid treating an obstruction as a minor inconvenience. Moving a hole a short distance without understanding what caused the obstruction can create another problem nearby. Instead, reassess the wall, mounting hardware, duct route, and appliance position as a complete system.
If the issue involves electrical wiring, gas, structural modifications, or a service whose location cannot be established confidently, professional assistance is the safer option. A short inspection is usually preferable to repairing damage caused by an incorrect assumption.
Pre-Installation Wall Inspection Checklist
Before drilling or mounting, make sure the main factors have been reviewed:
- Identify the wall construction and surface material.
- Locate suitable studs or structural support points.
- Check for possible electrical wiring and existing electrical components.
- Consider plumbing, gas lines, HVAC, and other concealed utilities.
- Inspect the wall for cracks, moisture damage, loose material, or old holes.
- Plan the duct route and exterior termination where applicable.
- Confirm the required clearance above the cooking surface.
- Check the hood’s electrical and mounting requirements.
- Consider cabinets and nearby appliances.
- Review the manufacturer’s installation instructions before beginning work.
This checklist is most useful when treated as a final verification step rather than a substitute for understanding the wall itself.
Final Thoughts
Installing a range hood should begin with inspection rather than drilling. The wall may contain electrical wiring, plumbing, gas lines, framing, or other components that are invisible from the kitchen side. At the same time, the wall surface, mounting support, duct route, clearance, and surrounding appliances all need to work together.
A careful pre-installation check can reveal problems while they are still easy to address. Identify the wall construction, locate reliable support, consider hidden utilities, plan the ventilation route, and confirm the required clearances before committing to the mounting position. When something is uncertain, especially around electrical, gas, or structural work, getting qualified assistance is safer than guessing.
For homeowners planning a broader kitchen upgrade, ciarra appliances can also be considered alongside the overall ventilation and cooking-appliance layout.
Top 5 FAQs
1. What should I check behind the wall before installing a range hood?
Check for wall studs, electrical wiring, plumbing, gas lines, HVAC components, and the planned duct route before drilling or mounting the hood.
2. How do I know where the wall studs are?
A stud finder can help locate framing, but its results should be verified carefully because other materials and concealed services can affect detection.
3. Can I drill anywhere behind a wall-mounted range hood?
No. You should first determine whether wiring, plumbing, gas lines, or other concealed components are present and confirm that the location provides adequate structural support.
4. Does the duct route affect where I install a range hood?
Yes. The mounting position should allow the duct to follow a practical route that meets the hood manufacturer’s requirements without unnecessary restrictions or obstructions.
5. What should I do if I find wiring or pipes behind the wall?
Stop and reassess the planned mounting position. Do not drill into an uncertain obstruction; electrical, gas, or structural issues may require qualified professional assistance.