If you’re considering upgrading your home’s heating and cooling system, ductless mini-split installation White Plains NY offers a modern, efficient solution for year-round comfort. These systems have gained popularity due to their energy efficiency, flexibility, and easy installation process. Whether you’re building a new home, renovating an existing one, or replacing an old HVAC system, ductless mini-splits provide a versatile alternative that doesn’t require the extensive ductwork of traditional systems.
This comprehensive Ductless mini-split installation White Plains NY guide will walk you through the installation process, step by step, helping you understand what to expect from start to finish and how to prepare for a smooth installation.
1. Initial Consultation and Assessment
The installation process begins with an initial consultation and assessment by a professional HVAC technician. During this phase, the technician will evaluate your home’s heating and cooling needs. They will take measurements of the spaces you want to heat or cool, assess the existing electrical system, and help determine the number of indoor units required for optimal comfort.
The technician will also discuss where to place both the indoor and outdoor units to ensure maximum efficiency and performance. This consultation is essential in designing a custom solution that works for your home and budget.
What to Expect:
- Site evaluation: The technician will measure and inspect your home to recommend the best system for your needs.
- Unit placement discussion: Together, you’ll determine the best locations for the indoor and outdoor units.
- System design and estimate: The technician will provide an estimate and a plan based on your preferences and the home layout.
2. Preparing for Installation
Once you’ve agreed on the system design, it’s time to prepare your home for installation. This step involves clearing the area around where the units will be placed, including moving furniture or other items out of the way to give the technicians easy access.
In addition to preparing the installation area, the technician will assess the electrical system in your home. Ductless mini-split systems require a dedicated electrical line to ensure that they have enough power to operate efficiently. If needed, an electrician may be required to make electrical adjustments.
Preparation Steps:
- Clear installation areas: Remove any obstructions around where the indoor and outdoor units will be placed.
- Electrical assessment: Make sure your electrical system can support the new system, and arrange for any necessary upgrades.
- Timeline discussion: The technician will discuss the expected installation time and any requirements before the work begins.
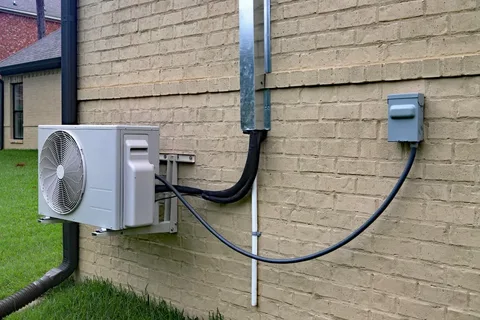
3. Installing the Outdoor Unit
The next step in ductless mini-split installation White Plains NY is the installation of the outdoor unit. The outdoor unit is typically mounted on a concrete slab or a wall bracket outside the home. It’s important to place this unit in a location with adequate ventilation to allow for efficient heat exchange.
The technician will connect the outdoor unit to the refrigerant lines and ensure that it’s securely mounted. The outdoor unit will also be connected to the power supply and prepared for the refrigerant line and drainage lines that will run between it and the indoor units.
What to Expect:
- Unit placement: The outdoor unit will be securely mounted, either on a bracket or concrete pad.
- Connection of refrigerant and drainage lines: The technician will run the refrigerant and drainage lines between the indoor and outdoor units, ensuring proper sealing and secure connections.
- Power supply setup: The outdoor unit will be connected to the electrical supply, ensuring sufficient power for the system.
4. Installing the Indoor Units
Once the outdoor unit is installed, the technician will move on to the installation of the indoor units. The number of indoor units required depends on the size and layout of your home. These units are typically mounted on walls, but depending on the design, they can also be mounted in ceilings.
The technician will position the indoor units in locations that ensure even distribution of air throughout the room, avoiding hot or cold spots. They will also connect the refrigerant and power lines between the indoor units and the outdoor unit, ensuring proper sealing and efficient operation.
What to Expect:
- Indoor unit placement: The indoor units will be mounted on walls or ceilings, providing unobtrusive but effective temperature control.
- Connection of refrigerant and electrical lines: The refrigerant lines will be connected to the outdoor unit, while electrical lines will power the indoor units.
- Airflow optimization: The technician will ensure that the airflow is optimal for the room size and layout, ensuring even cooling or heating.
5. System Testing and Calibration
After the indoor and outdoor units are installed and connected, the technician will test the entire system to ensure it’s functioning properly. This includes checking the refrigerant levels, ensuring that the system is properly charged, and verifying that the electrical connections are secure. The technician will also test the cooling and heating functions, adjusting the system settings for optimal performance.
During this phase, the technician will walk you through how to operate the system, including setting the temperature, using the remote control, and scheduling features.
What to Expect:
- System testing: The technician will check all functions, including cooling, heating, and drainage.
- Calibration: The system will be calibrated to ensure efficient performance and comfort.
- User demonstration: You’ll receive a hands-on demonstration of how to use the system, set temperature controls, and take advantage of any advanced features.
6. Final Walkthrough and Clean-Up
Once everything is tested and calibrated, the technician will conduct a final walkthrough with you to ensure that you’re satisfied with the installation. They’ll answer any remaining questions you have and explain any additional maintenance needs.
The technician will also clean up the installation area, removing any debris or materials that were used during the process. Finally, you’ll receive documentation, including the warranty, maintenance instructions, and any other important information related to your new ductless system.
What to Expect:
- Final walkthrough: The technician will review the installation with you and ensure everything is functioning correctly.
- Clean-up: The work area will be cleaned, and all materials will be removed.
- Documentation: You’ll receive the warranty, user manual, and other information related to your system’s maintenance.
Closing Perspective: Enjoy Your Ductless Mini-Split System
Ductless mini-split installation White Plains NY is a smart investment in home comfort and energy efficiency. By understanding the installation process, you can better prepare for the installation and ensure that your new system delivers optimal performance for years to come.
Whether you’re upgrading your home’s heating and cooling system or installing a new system, ductless mini-split systems offer an efficient, cost-effective solution that provides both comfort and savings. With proper installation and regular maintenance, your new system will deliver year-round comfort and energy savings.